[Git] Git Basics
Introduction to Git
Git is a version control system that records changes to a file or set of files over time so that you can recall specific versions later.
In this post, we will learn the basics of Git.
Three stages of Git
Git has three main sections.
- Working Directory
- Staging Area
- Git Directory (Repository)
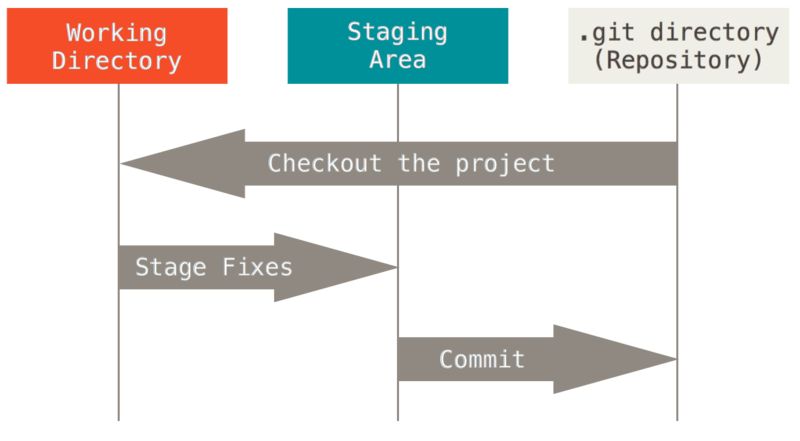
The working tree is a single checkout of one version of the project.
When we clone a repository, files are pulled out of the compressed database in the Git directory and placed on a disk for you to use or modify.
The staging area is a file that stores information about what will go into your next commit.
The Git directory is where Git stores the metadata and object database for your project.
Basic Workflow
The basic workflow of Git is
- Modify files in your working tree
- Selectively stage just those changes you want to be part of your next commit, which adds only those changes to the staging area.
- Do a commit, which takes the files as they are in the staging area and stores that snapshot permanently to your Git directory
After committing, you can push your changes to the remote repository.
Let’s see how we can use terminal commands to use this workflow.
| The basic Git syntax is **program | action | destination.** |
Assuming that we have a repository created in Github, we can clone it by using
$ git clone git@github.com:USER-NAME/REPOSITORY-NAME.git
If we clone the repository, the files are saved locally on our disk.
Then we can modify the files in our working tree.
Let’s see how we can add a file in the working tree and stage the changes.
$ touch hello_world.txt
$ git add hello_world.txt
In the code above, we created a text file called hello_world.txt and added it to the staging area.
Think of the staging area as a “waiting room” for your changes until you commit them.
Now, our changes to the hello_world.txt file are tracked by git.
We can always check the status of our files by the following command
$ git status
Then, we can commit the changes to the file, which is adding hello_world.txt. in this case.
It is a good practice to add a commit message by adding -m flag followed by a message.
$ git commit -m "Add hello_world.txt"
We can check the log of our commits by the following command.
$ git log
Now, we can always come back to this snapshot of the files because we made a commit.
To push the changes to the remote repository, we can use the following command
$ git push origin main
It means that we want to push the local changes to the remote repository. origin here indicates the remote repository in Github and main is the main branch of the remote repository.
After pushing the changes, we can see the changed result in the Github repository.
Cheatsheet for Basic Commands
This is the cheatsheet for the commands that are used in the basic Git workflow.
Commands related to a remote repository:
$ git clone git@github.com:USER-NAME/REPOSITORY-NAME.git
$ git push origin main
Commands related to the workflow:
$ git add .
$ git commit -m "A message describing what you have done to make this snapshot different"
Commands related to checking status or log history
$ git status
$ git log
Git Best Practice
When using git, it is crucial to make atomic commits
An atomic commit is a commit that includes changes related to only one feature or task of your program.
By doing this, we can
- revert the specific change without losing other changes;
- write better commit messages.
Reference
https://git-scm.com/book/en/v2/Getting-Started-About-Version-Control https://www.theodinproject.com/lessons/foundations-introduction-to-git https://www.theodinproject.com/lessons/foundations-git-basics